
Creating a Colorbox image gallery for Drupal 8
Written 25/11/2016
In this example I will be using a child theme of the CDN version of the "Bootstrap 3" theme. You can see what the gallery will look like by browsing through any of the hiking galleries on my website.
This tutorial is based on the excellent "Colorbox for Drupal 7, part 3: Building a image gallery and a image slideshow".
Remember that the "quote" marks are just there for clarity. Do not actually type them in when creating names or code.
Part 1: installing the Colorbox Module and Library.
First we need to install Colorbox into our Drupal 8 website. There are actually two steps to this. You need to install the Colorbox module itself - but also the library folder full of resources it will need before it will actually work.
Step 1. install the Colorbox module. Go to https://www.drupal.org/project/colorbox and grab the Colorbox module. Make sure it is the latest stable version for Drupal 8.
There are two ways to install the plugin itself. The easiest is to simply right click the download link for the module and "copy link location" (in other words, grab the address where the plugin is located from the Colorbox page at Drupal.org). Then log into the Drupal 8 admin panel for your website and go to the "Extend" page. Click on the "+ Install new module" button and then "paste" that address where the colorbox.tar.gz is stored in the field where it says "Install from a URL". Then click the "Install" button and your Drupal website will then go and grab the module for you and install it.
The second way is to download the plugin to your computer. Then go to the "Extend" page and click on the "+ Install new module" button and use "Upload a module or theme archive to install" and grab it off your computer.
Step 2. Since you are there anyway, you may as well download the library of resources that you will need for Colorbox to work. From the https://www.drupal.org/project/colorbox page, find the "Dependencies" heading (about two thirds of the way down the page) and click on "The Colorbox plugin 1.x" link and download the folder to your computer. Inside this folder is another folder called "colorbox". That is the folder we need.
Now we need to install the library of resources that Colorbox needs before it will actually work.
Open up your FTP client (I use Filezilla which you can download for free at filezilla-project.org). Use Filezilla to access the root folder of your website (the folder on the server that contains all the files and folders that make up your Drupal 8 website).
In the root folder create a new folder and call it "libraries" (without the quote marks). Then use Filezilla to upload the folder (and all the other files and folders inside it) that is named "colorbox" to your "libraries" folder. This is inside the "The Colorbox plugin 1.x" folder that you previously downloaded from drupal.org.
Make sure you go back to the "Extend" page of your Drupal admin panel and activate your colorbox plugin. You just need to tick the tick box next to "Colorbox" and click on the "Install" button at the bottom of the page.
It should all be working but just to double check, go to the "Reports" page in the admin panel and click on "Status report". If there is a problem it will be listed here in red. If the problem is that the "library can not be found" then you have installed the "colorbox" folder to the wrong place and also check your spelling . The correct path that Drupal needs should be "libraries/colorbox/jquery.colorbox-min.js.
Part 2: Setting up your Colorbox Image Gallery.
Lets do the fun stuff and set up our images!
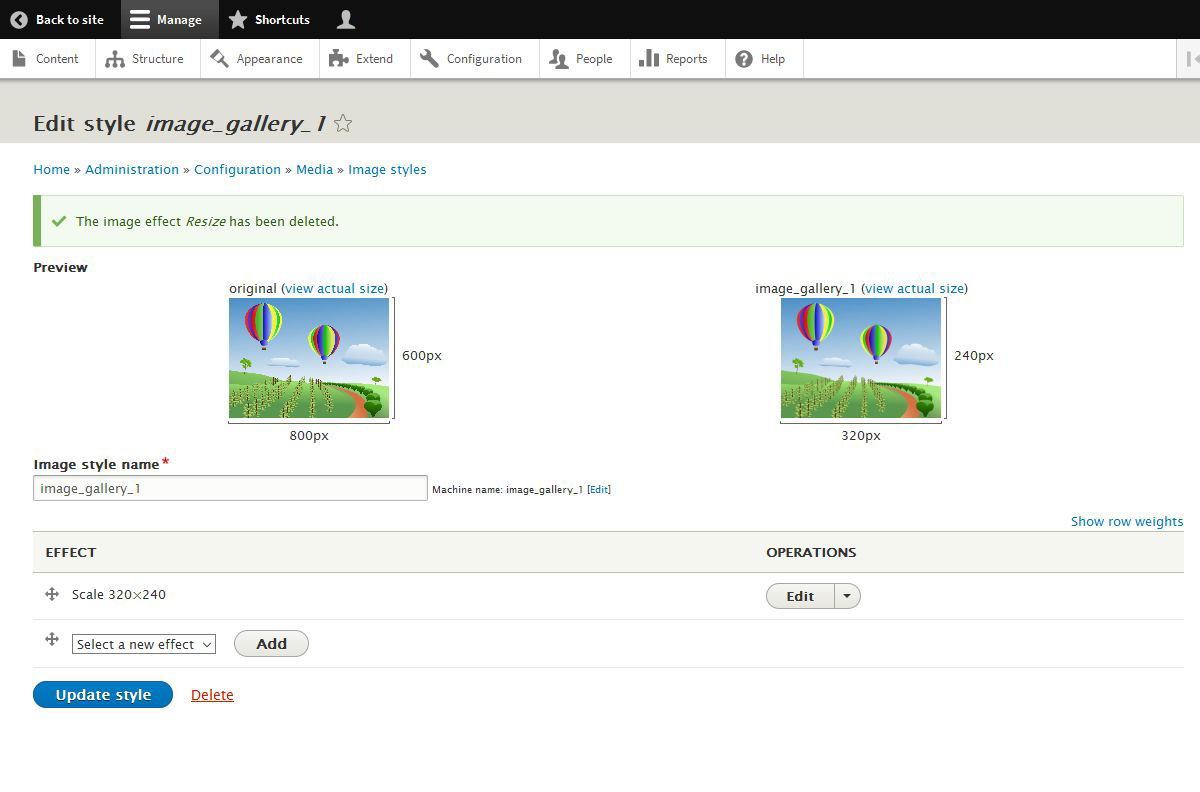
In your admin control panel go to Configuration>Image Styles (Image Styles is under the "Media" heading) and then click on the "Add Image Style" button.
Lets name this new image style "image_gallery_1". This will be for the big image at the top of the image gallery page. Then click on the "Create new style" button.
We are then going to add a "New effect" in order to set the size we want for the big image header on our gallery page. In the drop down box next to the "Add" button select "Scale" and click on the "Add" button.
Set the width to 320 pixels and the height to 240 pixels and click on "Add effect".
This image will always scale to fit a width of 320 pixels (so long as the source image is at least that wide). But the image displayed might be shorter if the original image is not 240 pixels high. If you are going to have odd shaped images you could instead choose "Scale and crop" with the same dimensions. This means that the images will be cropped to fit into exactly 320 by 240 pixels.
Now, let's create the smaller thumbnail images that will go underneath the big header image.
Go back to the "Image styles" page. Click on "Add image style" again. We will call this second image style "image_gallery_2". This image style will be a little bit different. Select "Scale and crop" and click on the "Add" button. Set both "Width" and "Height" to 100 pixels.
This will force the image to display as a 100 by 100 pixels square. If the source image is an odd shape then it will be cropped to fit. So, for example, a 300 pixel wide by 200 pixel high image will be shrunk down height of 100 pixels and then have it's edges cropped to fit into a width of 100 pixels.
Now for the next step - let's create a content page!
We are going to create a template page for our future photo galleries. This page is reusable. Once we have set it up you will see it as a permanent option whenever you click on the "Add content" button. Alongside the "Article" or "Basic Page" that is included with Drupal 8 by default.
Go the the "Structure" page and click on "Content types". Click on the "Add content type" button. Let's name this "Colorbox Gallery". In the description field you might want to put in a few words to remind yourself what this page is for (only you can see this description). There are some other settings but you can leave them for now (all the settings can be changed later).
Click on "Save and manage fields". Now we will add what fields we want to have displayed on this page. By default there will be a "Body" field of the type "Text (formatted, long, with summary)". This will let us have some text on the page so we will leave that in.
Click on "Add field" and in the "Add a new field" drop down box select "Image" and call this field "field_image_gallery_1". Click on "Save and continue". This will take you to the "Field settings" tab for "field_image_gallery_1" and in addition there is also an "Edit" tab.
In "Allowed number of values" at the bottom of the "Field settings" tab, change the the allowed number of values to "Unlimited" if you want this option (so we can have as many images as we want). In the "Edit" tab you may want to have all images upload to a particular folder of your choice (or just leave it up to Drupal to do it categorised by year and month). Also set the "Maximum image resolution" to 1280 by 1280 pixels (or whatever size you like). If you don't set a limit then the images will display at whatever their real size is. If you are allowing users to post images then you might also want to set the "Maximum upload size" of images. By default it is set to 2 MB. Also make sure the "Enable alt title" is enabled so you can have a caption for your images.
All the other settings can be changed later - so for now, the default settings are fine. Click on "Save settings". You will be taken to the "Manage fields" tab.
We have just added the field for big header image to our new page so let's also add a field for the small 100 by 100 pixel thumbnail images.
From the "Manage fields" tab (Home>Administration>Structure>Content types>Colorbox gallery) click on the "Add field" button again and in the "Add a new field" drop down box select "Image" but call this field "field_image_gallery_2". Click on "Save and continue". The settings for this field will be the same.
Just as before, in "Allowed number of values" at the bottom of the "Field settings" tab, change the the allowed number of values to "Unlimited". In the "Edit" tab you may want to set the "Maximum image resolution" to 1280 by 1280 pixels. If you are allowing users to post images then you might want to also set a "Maximum upload size" for the images. By default it is set to 2 MB.
You should now see three fields in our new content type and they should be in this order from top to bottom
"field_image_gallery_1"
"field_image_gallery_2"
"Body".
(use your mouse in the "Manage display" tab to drag and drop the "Body" field to the bottom. I think it looks better that way).
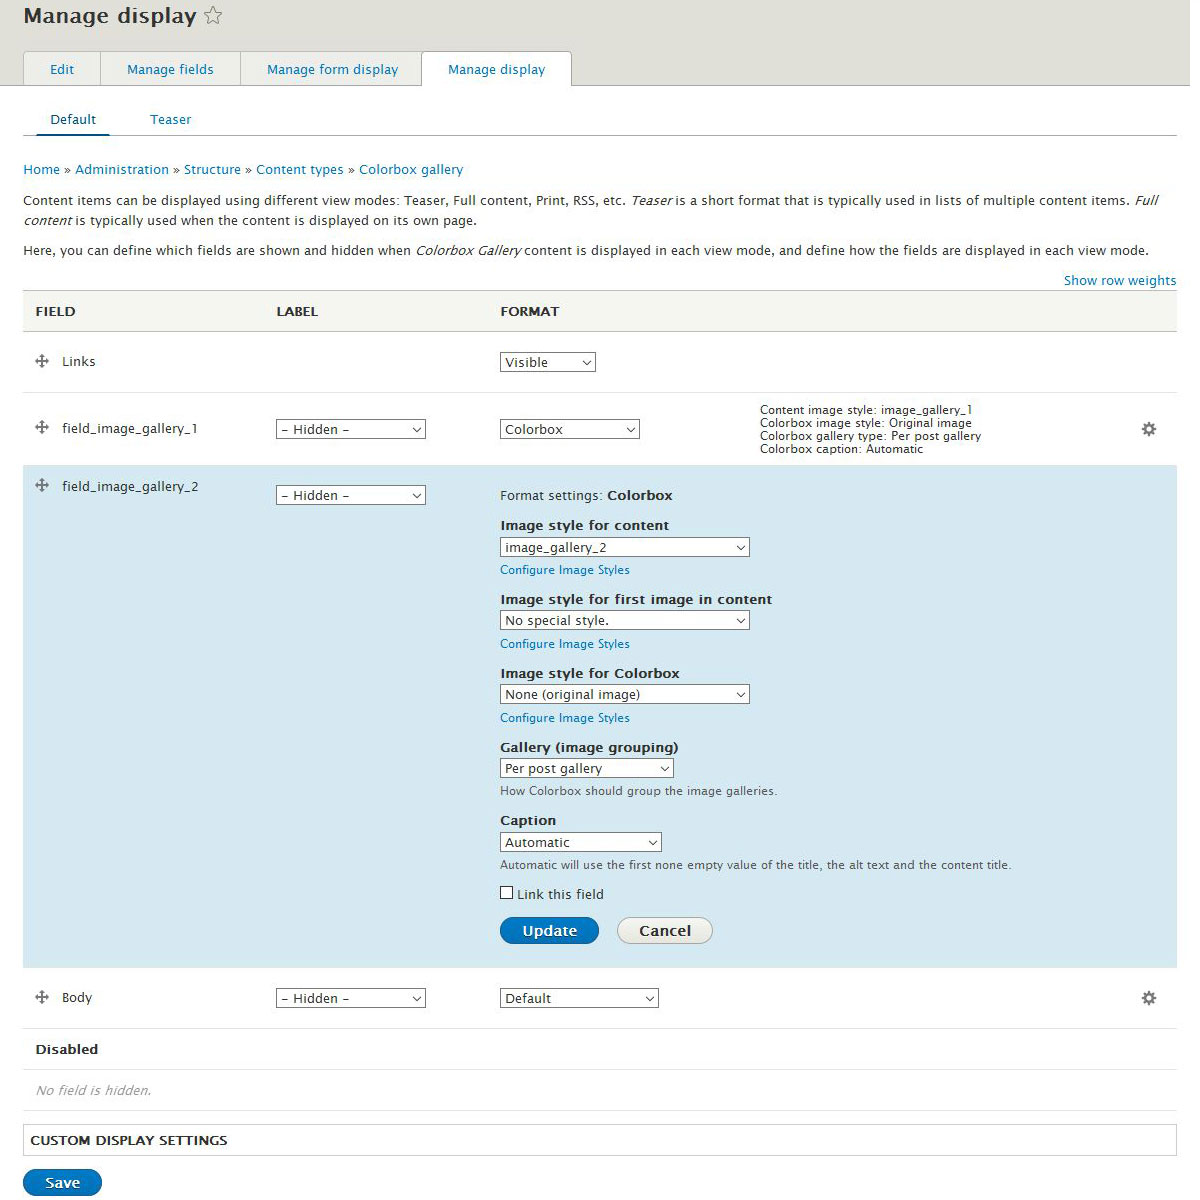
Now we need to manage the display of our fields and add the Colorbox magic to our images. From this same page (Home>Administration>Structure>Content types>Colorbox gallery) click on the little arrow next to the "Manage fields" button to open up the options and choose "Manage display". In the "Label" column, use the drop down boxes to select "Hidden" for all of our three fields.
In the "Format" column select "Default" for the "Body" field and "Colorbox" for "field_image_gallery_1" and "field_image_gallery_2".
On the right hand side of the rows for "field_image_gallery_1" you will now see a little cogwheel. Click on this so we can change some settings.
Under "Image style for content" use the drop down to select "image_gallery_1" and click on the "Update" button.
Now do the same for "field_image_gallery_2" but select "image_gallery_2" (our 100 by 100 pixel thumbnails). click on the "Update" button.
Click on the "Save" button.
Magic time!
Go to the "Content" page and click on the "Add content" button. There is now a content page in there called "Colorbox Gallery". Click on it and create a new page!
Set up your new page the way you like with a name, some text, etc and so forth! You will see field called "field_image_gallery_1" where you can add the 320 by 240 pixel image as your first gallery thumbnail image and a "field_image_gallery_2" where you can add all your 100 by 100 pixel thumbnail images. So add one photo for the 320 by 240 image and a few more for the 100 by 100 images.
Part 3: Theming the Colorbox gallery with CSS.
Now lets make it look pretty!
We are going to change how the text and images display on the page by adding some CSS styling to our Colorbox Gallery.
I am using the CDN version of the Bootstrap 3 theme for Drupal. So in my particular case I need to add the CSS I am going to be using to a file called "style.css" which is located at /public_html/themes/mycdnbootstraptheme/css/style.css (the folder "mycdnbootstraptheme" being the child theme I created for my website. Yours will be called what ever you named it).
The location of your CSS file will be different if you are using a different theme.
But for my theme I simply fire up my FTP client (as mentioned, I use Filezilla which you can download for free at filezilla-project.org) and use the passwords my hosting company gave me when I purchased my hosting package and open up the "style.css" file and edit it. (For safety's sake I would also download a copy of the original "style.css" to my computer - just in case!)
I add this code to the page.
.field--name-field-field-image-gallery-1 img,
.field--name-field-field-image-gallery-2 img {
  display: block;
  margin: 0;
}

.field--name-field-field-image-gallery-1,
.field--name-field-field-image-gallery-2 {
  float: right;
  clear: right;
  padding-left: 10px;
}

.field--name-field-field-image-gallery-2 {
  width: 320px;
}

.field--name-field-field-image-gallery-2 img {
  float: left;
  padding: 10px 10px 0 0;
}

.field--name-field-field-image-gallery-2 .field-item:nth-child(3n-2) img {
  padding-right: 9px;
}

.field--name-field-field-image-gallery-2 .field-item:nth-child(3n+3) img {
  padding-right: 0;
}
With Filezilla I just save the file and when it prompts me to save it to the server I tell it that's OK.
Open up your new Colorbox gallery page in a web browser and bathe in the glory of your magnificent creation.
Unless...... Nothing has changed. In which case go to the "Configuration" page of your admin panel and click on "Performance". Then use the "Clear all caches" button. You may also have to untick the "Aggregate CSS files" box.
I hope this has helped but please let me know what I have gotten wrong or where I could make things clearer by clicking HERE.